Taking your textures to the next level part 2
Posted by Vincent in Tutorials | 3 comments
One of the readers requested there should be more tutorials on this blog, so here is a little piece of advice, how you can improve your texture photography.
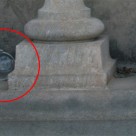
The devil is in the details! Therefore, carefully check your desired motive when looking through the viewfinder or at the live screen of your camera. I learned it the hard way, when I was looking at some of the pictures I took in Dresden a while back. Have a look at the picture below.

This would make for a brilliant texture photo, if there would not be one little object disturbing the picture. Look at the lower left corner and you will see what I mean.

I only noticed this plastic cup when I was already at home browsing through the shots on my computer and then of course it was too late. The only solution at that point would be some photoshopping and artificially removing the cup from the photo, but this mostly results in inferior pictures after all. The better option is to double check before taking the shot and remove the object.
I hope this tip was helpful. You might also want to look at the first post of this tutorial series.
There you mention something, mate! I could only guess how many times I cursed myself for not paying attention to the hidden details of the wonderful object I was about to shoot. True: you only notice these things afterwards, at home, when it’s too late. Very important also for portraits or people photography in general!
Nice tutorial. Good job. Great!!!
I’ve done the same thing – a 7UP bottle runied one of my favourite holiday snaps!